


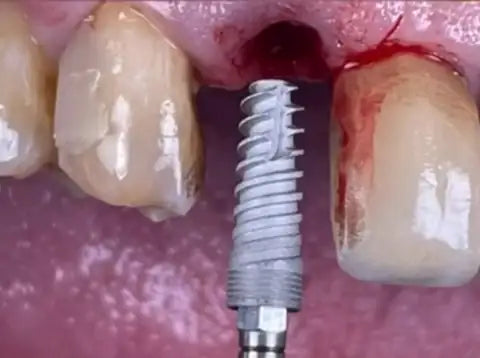
Single anterior tooth
Dr. Joan Faus López
Implant placement in the anterior region, followed by abutment connection.
More cases on InstagramFree shipping on orders of USD 500 or more · Express delivery
Licensed professionals · FDA 510(k) · CE MDR


Conix implant system
Tapered implant with a conical hex connection, SLA surface and self-tapping threads.
$135.00per implantper implant · same price for every size
Pick every size you need in one chart, then add all to the cart.
Use − and + in each size, or type the quantity. Then add everything to your cart in one step.
Conix shares its connection with the following implant systems. Always confirm the exact platform before ordering.
| Brand | Lines | Connection |
|---|---|---|
| Nobel Biocare | NobelActive | Conical hex |
Components of Alef, Til and Conix are not interchangeable with each other. eIFU · Contact MSDI
Components that are usually ordered with this item.
Real cases placed by clinicians who work with MSDI implants.
Dr. Joan Faus López
Implant placement in the anterior region, followed by abutment connection.
More cases on InstagramDimensions for every Conix diameter. All measurements are in mm.
| Implant Ø | Apical Ø | Apex Ø | Lengths |
|---|---|---|---|
| Ø3.5 NP | 2.65 | 1.45 | 8, 10, 11.5, 13, 16 |
| Ø4.3 RP | 3.45 | 2.25 | 8, 10, 11.5, 13, 16 |
| Ø5.0 RP | 4.2 | 2.95 | 8, 10, 11.5, 13, 16 |
From the MSDI R7 product catalog. Always read the instructions for use.
Every Conix implant has an SLA surface: Sand-blasted, Large-grit, Acid-etched. Zoom in from the implant to the electron microscope to see the texture that bone grows onto.


Move over the image, or press and drag on mobile, to use the magnifier.
1× · The Conix implant. The whole implant body, threads and apex carry the same SLA treatment.
50× · Thread profile and apex. The apex of an Alef implant under the scanning electron microscope. You can see the thread profile, the cutting flutes that make the implant self-tapping, and the even matte texture that covers threads, flanks and core alike.
400× · The SLA texture. Overlapping craters left by grit blasting, with a finer etched texture inside and between them. The scale bar is 400 µm.
The microscope images show an Alef implant. Conix implants receive the same SLA treatment.
The titanium implant is blasted with coarse grit particles. This creates the first level of roughness: craters and ridges tens of microns wide across the threads and the core.
The blasted surface is then etched in acid. Etching softens the sharp peaks left by blasting and adds a second, finer layer of micro-pits a few microns across, on top of the craters.
Each implant is packed in a sealed tube and held in a titanium sleeve, so the treated surface is not handled before it reaches the osteotomy.
Two scales of roughness on one surface: the blasted craters give bone room to grow into, and the etched micro-pits give cells and proteins a texture to hold on to.
A rough surface has far more area than a smooth, machined one of the same size, so there is more surface for bone to contact.
Research on SLA surfaces shows that bone-forming cells attach and spread well on moderately rough titanium.
The micro-pits retain the blood clot and proteins that start healing, which is the first step of osseointegration.
As new bone grows into the craters and pits, it locks with the surface, which supports implant stability during healing.
Drill sequence for every Conix diameter. Choose the bone density, then follow the drills from left to right. Drill diameters are in mm.
Cortical drillThe last, widest drill goes only through the cortical layer, not to full length. Conix implants are self-tapping, so the threads cut their own path in the bone below.
Max 60 NcmMaximum recommended insertion torque for Conix implants. Torque values do not replace clinical judgment.
Protocol from the MSDI R7 product catalog. Always read the instructions for use before surgery.
MSDI implant packaging is designed for efficiency, safety, and ease of use. Its patented delivery system ensures precise placement, giving clinicians full control and enabling reliable, predictable outcomes.

The Conix implant is a tapered, self-tapping dental implant with a conical-hex connection and two platforms: narrow (NP) and regular (RP). It has an SLA-treated surface, double-lead threads, a round apex and platform switching. It is available in NP Ø3.5 mm and RP Ø4.3 and Ø5.0 mm, in lengths from 8 to 16 mm.
Select diameter, length above. Each combination has its own reference code (SKU), listed below.
| Reference (SKU) | Diameter | Length |
|---|---|---|
| CX3508 | NP Ø3.5 mm | 8 mm |
| CX3510 | NP Ø3.5 mm | 10 mm |
| CX3511 | NP Ø3.5 mm | 11.5 mm |
| CX3513 | NP Ø3.5 mm | 13 mm |
| CX3516 | NP Ø3.5 mm | 16 mm |
| CX4308 | RP Ø4.3 mm | 8 mm |
| CX4310 | RP Ø4.3 mm | 10 mm |
| CX4311 | RP Ø4.3 mm | 11.5 mm |
| CX4313 | RP Ø4.3 mm | 13 mm |
| CX4316 | RP Ø4.3 mm | 16 mm |
| CX5008 | RP Ø5.0 mm | 8 mm |
| CX5010 | RP Ø5.0 mm | 10 mm |
| CX5011 | RP Ø5.0 mm | 11.5 mm |
| CX5013 | RP Ø5.0 mm | 13 mm |
| CX5016 | RP Ø5.0 mm | 16 mm |
Pick the platform first: NP for narrow spaces and RP for standard cases, then the length for the available bone height. Components are platform-specific: NP parts for NP implants and RP parts for RP implants.
Designed for the Conix conical-hex implant (NP or RP platform). Do not combine with components of another MSDI system; each system has its own connection geometry.
MSDI products meet the highest standards set by the FDA, CE MDR, ISO 13485 and other regulatory bodies. Some products may not have regulatory clearance for sale in specific territories. See the instructions for use (IFU).
NP is the narrow platform (Ø3.5 mm implant); RP is the regular platform (Ø4.3 and Ø5.0 mm implants). Prosthetic components are specific to each platform.
Up to 60 Ncm for the Conix implant.
A cover screw (NPCS or RPCS) is supplied in the package. The abutment screw (NPAS or RPAS) is supplied with abutments.
An SLA (sandblasted, large-grit, acid-etched) surface.